
Jewelry Armoire Make-Over
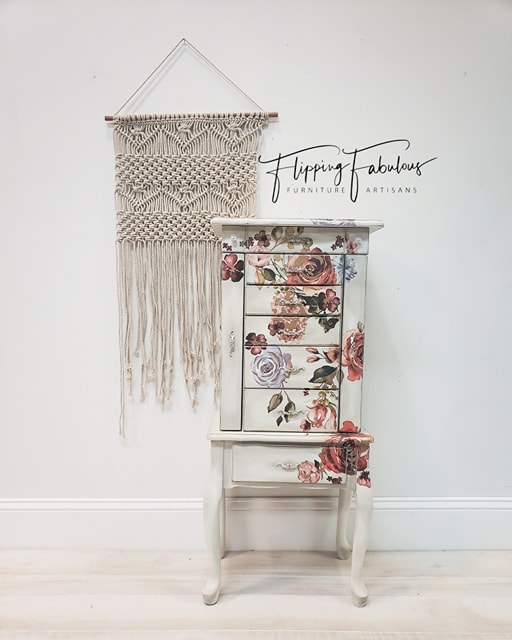
Up next, this Jewelry Armoire! Notice where I messed up my transfer?
No? Look close! Let’s start at the beginning and troubleshoot.
I found this super nice little oak armoire on Facebook Marketplace in another town. On one of my trips to see my teenager at college (Lord help my wallet, because it seems like she’s always spent her money on groceries… but never has any food in her refrigerator), I picked it up. Technically, I loaded up a vehicle, which is one way I find to make my resale business profitable.
I started by cleaning it and scrubbing with Krud Kutter. I always use Krud Kutter, and even though it says “non-toxic,” there is not one ounce of me that believes this. If it takes off paint & stain, it just can’t be good for you. Do your future window licking self a favor and put on some gloves. What I think about Krud Kutter’s non-toxicity claim:

After Krud Kutter, I always use Fusion’s TSP, which is actually a non-toxic TSP substitute. Once it was dry, I started with my Fusion Mineral Paint Raw Silk, which just has to be the best color. Not quite totally white, no noticeable yellow undertone, just a perfect farmhouse white. I used the Staalmeester Hybrid Round, which is a great brush, second only to the Staalmeester ONE… the Ferrari of brushes. I left the handles on because those little suckers are super hard to get off and back on. This comes back to haunt me later.

I know I want to use the reDesign with Prima Rose & Rouge transfer (sorry, no direct link, because this transfer is completely sold out, even with Prima, and won’t be available until June). Here’s where you really need to take your time and be patient. You don’t need to use the whole transfer just because you can. Or do, BUT you need to have some balance to your piece. During workshops, I suggest that you pick the focal floral (or whatever is on your transfer) and figure out where you want it to be. I knew I wanted the floral design to cascade down, or rise up the side, so it kind of wrapped the jewelry armoire. I laid out the transfer, and I knew that ledge at the bottom was going to be tricky, so I actually cut that floral in half.

You can see here that I did not do a good job of laying the transfer flat before I started using my transfer tool. Don’t panic, and don’t give up. I will show you how to fix it enough that YOU will always be OCD over it, but it doesn’t destroy your piece.
Next I cut out different areas of the florals and tape them on the armoire, until I get them balanced and to where I can add small pieces, but I have the general layout. I always add or move a little. It’s just a blueprint, you can still change things up. The drawers are a challenging point for some. I keep a razor close (see my handy box cutter) and make a slit where I don’t want the transfer to drag. This makes it easier to rub on the curved drawer edge, and it also keeps the transfer from pulling up when I pull off the backing.


Next, I put my design all over the armoire. Just be patient on edges. After I put on my transfer, I use my fingers to gently burnish the transfer on by rolling them, making sure to get out any slight bubbles. Don’t rub - my fingers (as you can see) are always covered in some funk, and you may have something on your fingers that will pull up your transfer. Same with sandpaper. Light light light! Notice where then handle is off? Yeah, that’s because I realized that the transfer would need to go under them. Hot mess party of one.

Now I’m going to add a cautionary photo. I don’t ever do this (except so that I could take this photo). I always keep both hands available for my transfer. I put one hand pulling the transfer off (as shown), but I always keep my other hand free guiding the backing. Why? If I pull off that whole piece of backing, and there’s part of the transfer I have not burnished to my piece well enough, you can bet it may take an additional piece of your transfer and get all gummed up for you to throw away, crying and cussing. Easy does it! Go slow! I continually use my tool as I’m pulling up my backing. That way, if it doesn’t come off the backing completely, you haven’t messed up your design - you can always push it back down.
I like to lightly distress my edges. I’m careful with my sandpaper around the transfer because you don’t want a little sharp sandpaper edge pulling up more than you intend. I like it to look worn on the edges like an old book, but I don’t want my entire transfer distressed on this piece. I sealed with Fusion Clear Wax & then some Fusion Ageing Wax around the edges. Fusion’s Ageing Wax is THE BOMB. It’s not super intense, so if I want it super dirty, I can add more after it’s dry. It just gives a nice, aged look.
So back to my mistake. See why it’s not such a big deal? It just is what it is. I used more Ageing Wax in those respective corners to pull the eye away. It’s noticeable now that you know it’s there, but it’s not a deal breaker. Embrace your mishaps. Art is full of them, and while you’re saying “I’m no artist!” - YOU ARE. You are taking something bleak and making it fab. That’s art.
All items mentioned in this how-to are available in our online store and in our brick and mortar (in Kansas… come see us! We’re totally worth the drive!)! For a while, you’ll have to sub the Rose & Rouge (sorry to bring that up again, but blame it on yourselves because it’s such a popular transfer)… and we have NEW TRANSFERS COMING IN 2 WEEKS (you can pre-order on our website here). Thanks for coming by!


