
Stenciling your staging floor
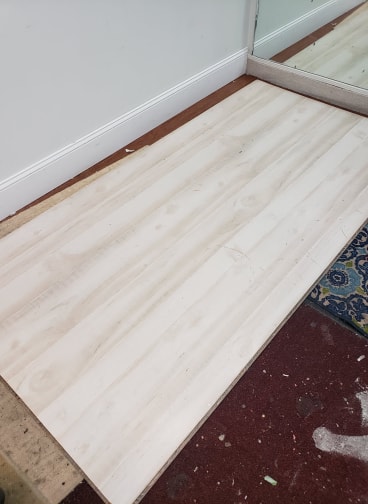
Want to stencil your staging floor? Here’s an easy how-to, giving your “plain” pieces a little more sass! We have limited space, so our workshop doubles as our staging area, making it hard to get super out of the box creative. These “wall panels” are great because they are inexpensive and easily interchangeable. This particular one, however, had seen better days. It’s hard to tell by the photo, but it is BEAT UP.
These panels also have a flame retardant on them. This one is a couple years old, and we have dragged pieces across it, and not treated it kindly, so I wasn’t real worried about the fire retardant. Note: if your paint blotches, your piece probably has a fire retardant on it. Fusion will still adhere, but it will look funny for a couple of coats.
What you’ll need for this project:
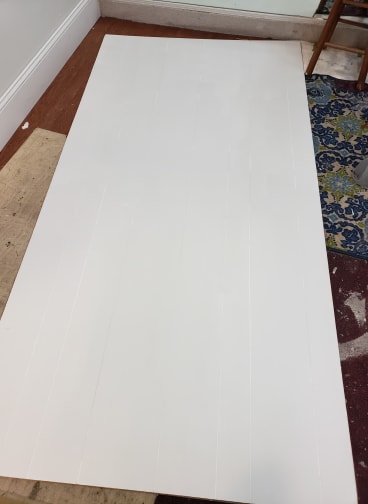
2 coats of Lamp White rolled on
After you’ve cleaned the panel with Fusion’s TSP, give it 2 coats of Lamp White. Let it dry completely. Get enough paint on your roller that you don’t leave lines where you’ve rolled. The microfiber roller will leave a little texture, but Fusion is a self-leveling paint, so if you get a correct amount on your roller, it minimizes the texture. For this project, the texture is totally fine. On a dresser, or table, which are other areas I use the roller, I roll a coat, then smooth out with a Staalmeester ONE brush (for those of you cringing because of the price, INVEST… you'll never regret it!).
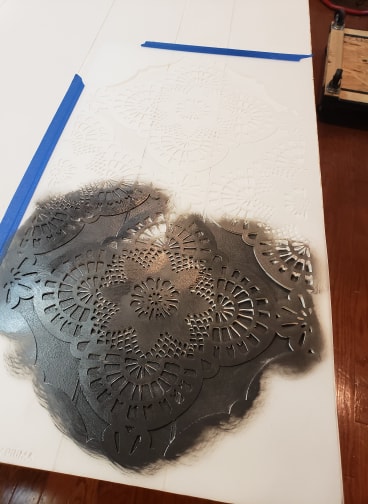
Now for the fun part. I used the redesign with Prima Millicent Lace Raised Stencil. This stencil is designed to be used with a medium if you want raised areas, so it’s thicker than the normal stencils. For this project, I opted not to use a texture medium, and just use the stencil with paint. The Staalmeester wax brush is so amazing to use as a stencil brush. I have 2 of these brushes - one for wax, one for paint. I DO NOT use the wax brush for paint. Badddd results if you do this. I put tape on 2 edges of my stencil just to keep it from moving around. I use just a dab of paint. I offload the paint onto a napkin or cheesecloth, and then I take the stencil and move it in circular motions. Jennylyn did a tutorial on this (check out the Fusion YouTube channel). I used Ash for a specific reason - it has exceptional coverage, so I can use very little, and know that it’s going to have great results.
As mentioned above, Ash covers amazing. I didn’t want a super dark stencil, so I’m not really caring if some areas don’t get full coverage. I can life the edge of my stencil up to make sure it looks good. On a piece of furniture, I would be more careful about bleeding under the stencil, but this is going to be used for staging, and as much as I’d like for it to stay nice forever, it just won’t. I move pieces of furniture over the staging panels, so they take some hard knocks. I will probably have to touch it up, even as bulletproof as Fusion is.
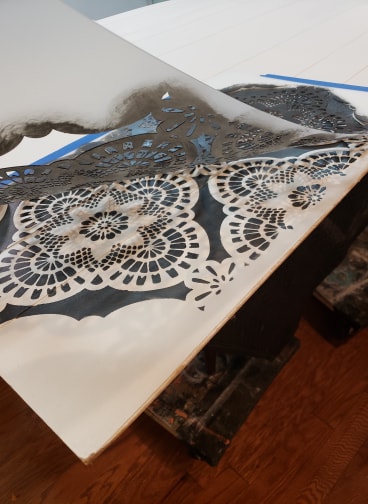
After you get your first pattern done, you may be wondering how on earth you get them symmetrical. I’m glad you asked! You’ll overlap your design so it lines up like so:

You can see where the paint and stencil line up at the edge

You’ll continue to do this until you see that you have your floor covered, but some missing spots. You’ll then fill in those spots with one of the designs from your stencil. Sometimes, they won’t line up exactly. That’s okay. Just do your best. I would be a little more particular on a furniture piece, but for a floor, nobody will notice. Now, you can celebrate. You can see the finish line. And it looks amazing. You can distress it if you want. I started to distress my first square, and I dug it, but realized that we were pretty much going to distress it naturally, so why waste my time.

To distress anything, I grab a sheet of 3M 225 sandpaper, and just fold it into squares, tearing it. This gives me a little control over the pressure I put on it. On furniture, I don’t get distress happy. I only run the sandpaper over areas that would naturally distress - drawer edges, top edges, etc.. In my early painting days, I thought the more distressed, the better. Today I just view furniture art differently, and just because that’s not my style, doesn’t mean it’s not okay - it’s just not my style.
Lastly, I put Fusion’s Tough Coat over it. If you’ve never used Tough Coat, it’s a must try, but, like most topcoats, it has a learning curve. I use a damp sponge to apply it. If you don’t get enough on, it will drag and streak, so be sure to get enough on your sponge. It is non-yellowing, so while you don’t need to worry about that, don’t let it pool. Just use nice, easy glides of your sponge. Don’t overthink it. Want to see the end result? Here you go! This entire project took me less than 2 hours, and was pretty fun. I love this design, and can’t wait to use it on a piece of furniture! Be sure to head on over to our “Shop” tabs to grab your supplies!

