
Simple to Sassy
Hey Fab Followers! Let’s give this blog stuff a whirl.
We have an upcoming class on March 28. The Decor Transfer 101 class is to introduce users to a couple lines we carry in the store - Fusion Mineral Paint, General Finishes, and ReDesign by Prima Decor Transfers and the Stick & Style Stencil Rolls. This how to will be a quick transformation of a plain Jane $12 Hobby Lobby step stool into a fun pop of personalized color!

Let’s start with a trip to Hobby Lobby, where you ONLY get this $12 step stool.
I cleaned the stool with Fusion’s non-toxic TSP; even though it’s raw wood, I’m sure lots of greasy fingers have touched it, and it’s probably going to get some high traffic for teeth brushing by my super adorable niece.

You can either design your stool around your transfer, picking your color after you pick your floral arrangement, or the other way around. I picked Fusion Mineral Paint Laurentien, a fun Robin’s Egg Blue with a twist.

I used my Staalmeester Hybrid Round 18, which was probably too big for this project, but since I started using it, it’s hard for me to use another brush.
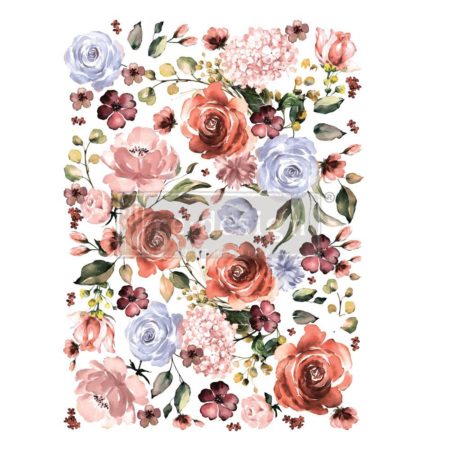
Raw wood will absorb the paint pretty quick - I almost always need 2 coats on raw wood. After my coats are dry, I use my Klingspor flex sanding sponge - these are amazing and you will use them for a really, really long time) all over my piece. It makes the paint feel instantly smoother. Wipe off your stool with a dry tack cloth or blue shop towel to get the paint dust off. Now I grab my transfer - I picked Rose & Rouge, because I’m obsessed with it. The florals are amazing, and the gold lining around the edges… be still my heart.
My favorite thing to do with decor transfers is to cut them up and rearrange them. I like to add my own personal touch, and this allows me to design a piece and give it a unique signature. I had part of 2 pages of this transfer left over, so I used a partial page for the stool. I knew I wanted to put my nieces name on her stool, so I positioned the transfer on the corner. I always keep the backing on the transfer while positioning it. Once I’m certain of where I want to put it, I pull the backing off, and press it firmly onto the piece. This is an easy surface, because it’s flat and inexpensive - the perfect project to experiment on instead of a nice piece of furniture for your first transfer. Once I’ve pressed it firmly onto the stool, I use my transfer tool to rub the transfer on. Here’s a tip: if you break a transfer tool, you’re not doing it right. I broke 3 my first transfer. You’re making it too hard - and if you do it this way, by the way, your arm is going to be sooorrreee tomorrow. Rub it all over with your tool, then find a corner to start. Pull up that corner a bit, with one hand pulling up the transfer, and the other gently rubbing with the tool. As your pulling up the transfer, you can tell whether it’s adhering to the stool. If it’s not, lay the clear backing back down and use your tool to leverage and cause some friction. I’ll do a live soon to show it in action, and I’ll also post a link to the ReDesign YouTube tutorial below.
After I have my transfer on my stool, I use my fingertips to ensure that it’s firmly adhered. Don’t rub over it too quickly, or you may pull some up. Next step: admire your transfer. It’s totally okay if some of it didn’t come off. It happens. Rarely, but it happens. No biggie. The distressed look rocks.
Before I use my name stencil on my stool, I put one coat of General Finishes High Performance Satin on my stool. This helps ensure the fresh paint doesn’t come up when I pull my stencil off & helps with bleed through (from using too much paint on my stencil). I use my Kingspor sanding sponge after my coat of HP (High Performance). I position my stencil and I’m ready to make it personal! For her name, I wanted to use a soft neutral - in this case, I used Fusion’s Raw Silk, our most popular warm white. I press my adhesive stencil down, and I put a very light coat of Laurentien on - this helps prevent my white from bleeding through if I get too much. Every class, I have one person who uses too much (it might be me most of the time). After my light coat of Laurentien dries, I stipple on my Raw Silk, let it dry, and pull off my stencil. Again, I use my flex sanding sponge, wipe off the dust, and put another coat of HP Satin - even though Fusion has an industrial grade acrylic topcoat built into it, I have enough kids, nieces, & nephews to know that it is going to be USED… heavily. The end result is so fun!
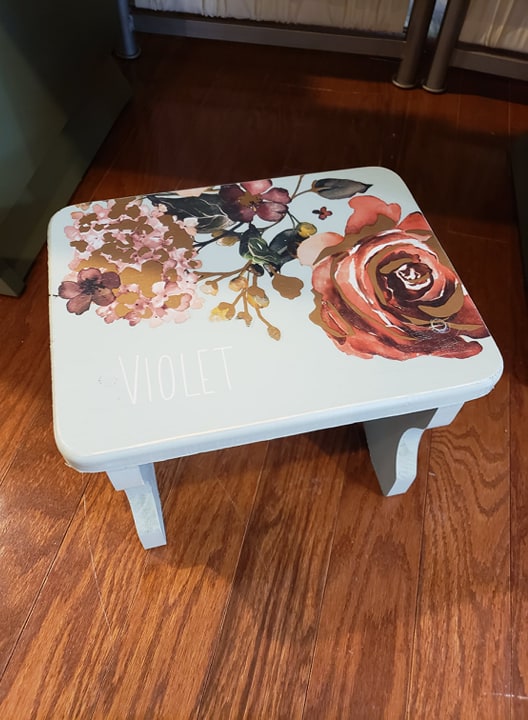
Waaaaallllaaaaa! Shop for your Fusion Mineral Paint, General Finishes, & ReDesign with Prima Decor Transfers on our website (www.flippingfabuloussalina.com)!